by Babitha & Sreejith
Babitha & Sreejith, ardent terrace gardeners take on the quest for finding an affordable, sturdy and aesthetic solution for garden stands. This is the detailed documentation of their journey, solutions and suggestions.
On our mission to make stands to hold pots for our terrace garden, we chose PVC stands over metal stands for these reasons:
- Economical
- Easy to assemble and disassemble (If you have not used glue).
- Can be designed to easily fit in any corner. (We had many small corners between the pillars and walls)
- Looks to be maintenance free .
Disclaimer: We are not advocating for or against any type of stand or any brand or any vendor. This post is just our experience documented here. We have no prior experience in making PVC stands. These projects are done exclusively by us, a husband and wife team, without any professional help. Since we are still barely out of our experimenting phase, we cannot guarantee or vouch for the life span of these stands. But looking at the sturdiness, it does seem to nicely hold all the pots and drums and lo! that’s what we terrace gardeners want, right?
So here we are documenting the details, which could help many people. We have also provided pictures to make you aware that the garden stands can be raised to the desired height with bare minimum essentials, at a minimum cost. Please ignore the background mess in the pics 😄 . They were taken when the work was in progress.
Materials Needed
| Item | Description |
|---|---|
| UPVC Pipes | ¾ Inch (We chose this since we have 20 ltr paint buckets and 55 litres drums) OR ½ Inch (Depending on Load in your pots /grow bags) Every Nook and corner Hardware Shops have these. But are comparatively expensive. The most common brand found was Ashirwad/Prince.(The details are mentioned down the line) I had chosen Prince brand. This brand costed relatively less, was sturdy and readily available and vendor was quite cooperative. You can choose any available brands which costs less, easily available and good customer support (availability of connectors & stuff). Once you decide to get in bulk, check out for any wholesale dealer in your area/close by. (JustDial, India Mart and such apps help a lot, but patience to find an apt source is needed) . NOTE: The connectors and the pipes should be of same brand. The outer diameter varies for every brand. |
| Tee Joints |  |
| Elbow Joints |  |
| Cross Connector |  Needed Only if multilevel stands are in design |
| Glue/PVC Solvent | They come with a small brush inside the glue itself.(Around 100 ml) |
| Pipe cutting Machine OR Hacksaw Blade | Pipe cutter – Mine looks something like this. I had not purchased it online , so no idea about the brands . Main advantage – Less /Absolutely no plastic waste particles unlike hacksaw. Gets our job done very fast. Hacksaw – Works equally well. But expect plastic dust and some blisters on hands (If doing it in bulk and if no prior experience) |
| Hammer | A heavy hammer to nicely assemble the joints with the pressure/force rather than glue. |
Vendor Details : Prince Systems Pvt Ltd, 1st Floor MRR Lane, SJP Road Cross, Bangalore – 2. ( Deepanjali Nagar Metro station is the closest Landmark) Jitin Gupta – (Ph) +91-8431234499.
What We Did:
FIRST ATTEMPT – Prototype:

This is what we did first, and then understood the flaws .
Dimension: 3 ft x 2.5ft x 1.5 ft. We customised the width of the stand to be the same as the width of the pot.
Flaws of our first attempt:
- Legs of support protruding outside . This tends to lessen the support and the pipes started to bend with weight.
- No support in the middle. (We just had lighter flower pots in mind for this, so this flaw didn’t bother us much.)
- Tube stoppers (see the red circled portion) are actually not necessary. We did not use it in further designs as is evident in the following pictures.
STAND #2 – Double Level Stand:

This was our second design, a two level stand. Stacking of pots for small plants is possible with this design.
Dimensions: 6 ft x 2.5 x 1.5 ft
Quantity of connectors: T’s – 24nos., Elbows – 6nos.
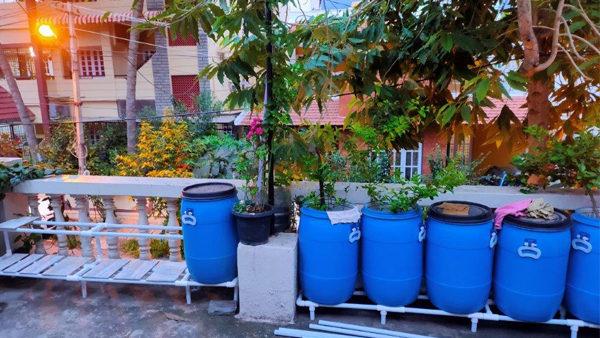
STAND #3 – Supports 55l Drums & 20l Buckets

These are subsequent trials – This is to give an idea of how we placed our 55ltr drums and 20 ltr Paint buckets on the stands.Some place where the pots have uneven base , have placed some unused or broken tiles.
Dimensions: 14 ft(400 cm) x 1.5 Ft x 1.5 Ft
Quantity of connectors: T’s – 22nos. , Cross connectors – 4nos, Elbows – 6nos.
STAND #4 – Single Level, for 20l Buckets

Tow single level stands parallel to each other. This is exclusively for 20 ltr buckets. (The other stand is just behind this row and not seen in the picture.)
Dimensions (for one stand): 15 ft x 9 Inch x 6.5 Inch
Quantity of connectors: T’s – 15nos. Elbows – 4nos.
Total connectors (for both stands) – T’s – 30nos , Elbows – 8nos.
STAND #5 – Combining a Double Level & Single Level Stand

This side of the view is a 2 level stand.
Dimension: – 7 ft x 1.5 ft x 1.5 ft (total ht)
This double level stand in the first picture continues as a single level stand at the other end. Such ideas are possible with PVC pipes.
Dimension: – 5 ft x 9 Inch x 6.5 Inch (ht)
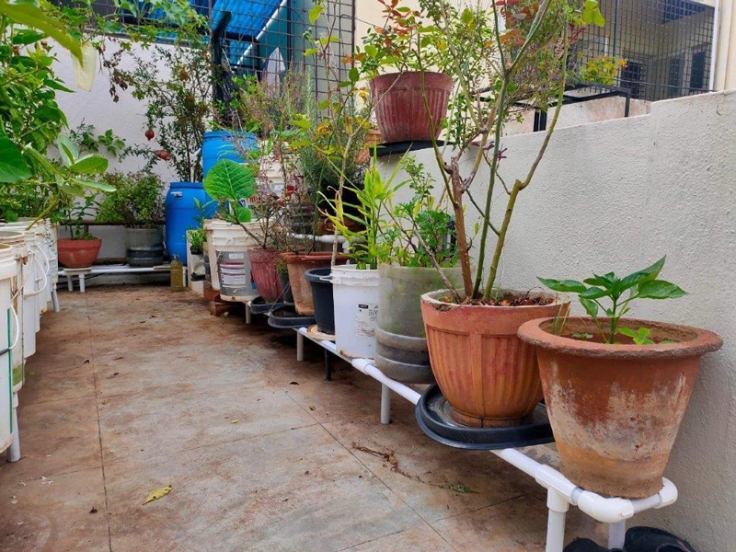
STAND #6 – Single Level Stand

Dimension: 14 ft(400 cm) x 9 Inch x 5 Inch
Quantity: T’s – 25nos , elbows – 4nos.
STAND #7 & #8 – Drum Stand:

This is a single level stand for Heavier stuff. Shorter legs are the best for load balance and sturdiness.
Dimension: 5.7 ft x 9 Inch x 5 Inch(ht)
Quantity: T’s – 18nos , Elbows – 4 nos .
Extra Support: Total 10 legs for support (5 on each side) . 5 Pipes supports in between.


On the left side of the picture is a 2 Level stand with odd shaped pots which are placed on tiles for better compatibility.
Dimension: 7 ft (190 cm) x 1.5 Ft x 1 ft (total ht)
Quantity: Ts – 14nos , Cross Ts – 3nos, Elbows – 8nos.
STAND #9 – Corner Stand
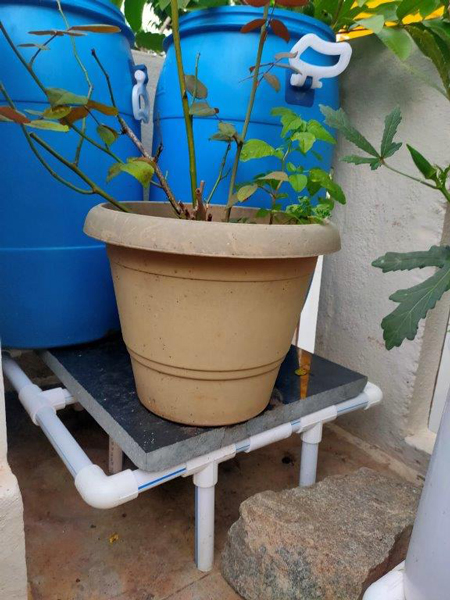
Corner Stand – 2nos of 55 Litres drums with other pots
Dimensions: 2ft x 2ft x 2ft
COST & BRANDS USED
1st and 2nd attempt was with Ashirwad Pipes from nearby hardware store . This was just a prototype (sort of ) and to check if its really doable or not. Hence just bore the expense without much thoughts.
| Item | Quantity | Total Price (Rs.) |
|---|---|---|
| UPVC Pipe (3/4 Inch (20mm), 6 meter Length,~20 ft ) | 3 | 1170 |
| Elbow(20mm) | 25 | 750 |
| Tee (20 mm) | 35 | 1050 |
| Other stuff like glue , hacksaw etc | 1 | 200 |
| Total (Inclusing GST) | 3000 |
The next was a bulk order with the break up of items mentioned as below. Prince Brand was used. (If there are any other brands which costs less please do remember to notify us.)
Breakup of the cost (Initial quantity when we purchased- The addons are mentioned alongside ):
| Item | Quantity | Price/Piece | Total |
|---|---|---|---|
| UPVC Pipe (3/4 Inch (20mm), 6 meter Length,~ 20 ft) | 15 | ~269 | 4046 |
| Elbow( 20mm) | 75 | ~12 | 864 |
| Tee (20 mm) | 100 (Got another 100 nos) | ~10 | 1008 (Add Rs. 1008) |
| Cross Tee (20 mm) | 20 | ~18 | 361 |
| Total (Inclusing GST) | 7410 |
YouTube Video Links/References
There are a plenty of videos and mostly in Telugu, (when we initially started searching for such videos). There was one, which was shared in many gardening groups as well
TIME TAKEN :
The PVC pipe stand idea occurred to us only by end of June. We both could work only on Saturdays and Sundays. The initial/first stand took time ( around 2 hrs ) .The later ones were easy to visualize the design and calculate the quantity.
DO’S:
- Choose the Length of the pipe (length between 2 supports) depending on the load of your pots.(We had chosen 2 ft & 1.5 ft).
- Start by just assembling . Glue can be added only to the joints like Legs which tend to shake at the slight movement/drag.
- Transportation charges can be avoided if choosing dealers close by. Materials can be picked up by getting the pipes cut in 3-4 metres length which can easily be fitted in any regular SUV. We got it in our own vehicle. [We had got it from Mysore Road dealer but then we didn’t have a choice since the Lockdown was announced in the coming week. But no regrets since the quality of pipes seemed to be good.] This seems to be tedious but believe me it was simple with little planning and coordination with the vendor regarding the stock availability. The material purchase happened in one quick visit.
- Plan the Design according to your terrace , get the idea of items and quantity (approximate) . Call up the vendor and ask for quote . Visit the place and check the quality and finalise it .
- Once assembled, try not to let the pipes be exposed to harsh weathers. Covers the pipes with pots as much as possible . If not , with anything readily available like bigger broken tiles, etc.. This can help increase the life hopefully.
- There are different types of connectors , which will be useful when going for multilevel stands . Those are only on order basis, so plan and or proceed accordingly.
DON’TS:
- Do not crowd the same dealer. This will increase the demand and might inturn lead to increase in price as well.
- Do not try to combine different brands of pipes. Even if you are combining please ensure to take a sample connectors for a fitting check. [ Only for Novice people – Not for professionals.. ]
IMPROVEMENTS:
- Looking for contacts of dealers/wholesalers from other OTG ‘ians who can provide at a lesser rate than mentioned , provided the logistics doesn’t eat up the difference costs.
- We had used the connectors that was readily available. Hence any improvements in design or any new ideas are welcome.
Please do share your knowledge. - Other connectors, which can help reduce unnecessary joints, is like shown in pic. The names may differ , but by looking at the pic and matching it with your design, can help selecting the apt product from the vendor’s catalog.

NEXT PROJECT :
To Connect the drain holes of the buckets and drums and collect the excess water which just runs off. One video showed usage of electric curved connectors for connection from pots to a main hose. If anyone has already done it, request you to please share the ideas. Anything small or big can help us be creative. Pros and cons of such ideas are much appreciated!
